Archive for the 'LinuX' Category

May 11 2026

Instalasi Virtualmin error di ubuntu 24 solusinya ke AI Deepseek gess

Published by under LinuX

https://chat.deepseek.com/share/wo6rxbjf9pmpl4cq9n


Langkah penyelesaian:

1. Backup dan hapus konfigurasi Virtualmin yang ada

bash
rm -f /etc/apt/sources.list.d/virtualmin.list
apt-get clean
apt-get update

2. Unduh installer dari GitHub (tanpa autentikasi)

bash
wget https://raw.githubusercontent.com/virtualmin/virtualmin-install/master/virtualmin-install.sh -O /root/virtualmin-install.sh
chmod +x /root/virtualmin-install.sh

3. Jalankan installer

bash
bash /root/virtualmin-install.sh

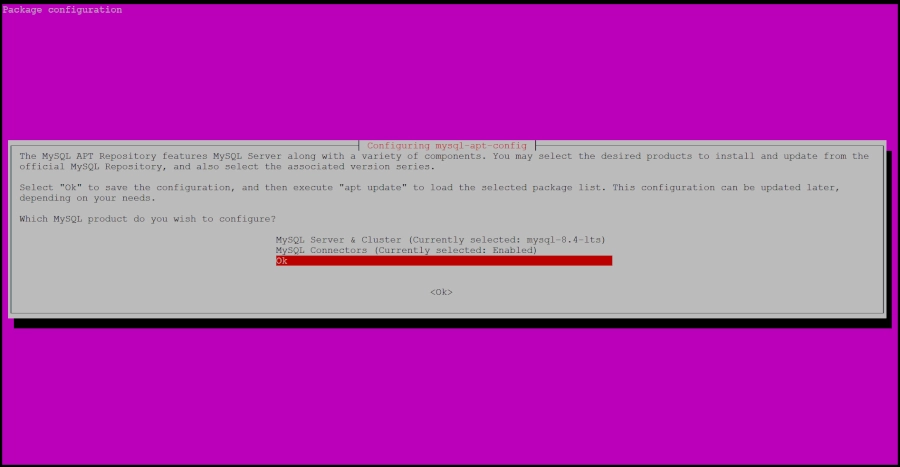
Installer ini akan mendeteksi sistem (Ubuntu 24.04 Noble) dan menambahkan ulang repository Virtualmin dengan konfigurasi yang benar. Seharusnya proses instalasi berjalan tanpa kendala ukuran file karena script menggunakan mekanisme yang lebih mutakhir.


Jika langkah di atas tetap gagal dengan error ukuran file yang sama

Opsi A: Unduh dan instal webmin secara manual (paksa)

bash
cd /root
# Unduh file .deb langsung (abaikan peringatan ukuran)
wget --no-check-certificate https://download.virtualmin.com/pool/main/webmin_2.641-1_all.deb

# Install
dpkg -i webmin_2.641-1_all.deb

# Perbaiki dependency
apt-get install -f

# Setelah webmin terinstall, jalankan ulang installer Virtualmin
bash /root/virtualmin-install.sh

Opsi B: Ganti mirror sementara

Buat file /etc/apt/sources.list.d/virtualmin.list dengan isi:

bash
echo "deb https://mirror.virtualmin.com/virtualmin/ noble main" > /etc/apt/sources.list.d/virtualmin.list
apt-get update
apt-get install webmin virtualmin-core -y --fix-missing

Opsi C: Tunggu sinkronisasi mirror (10–30 menit) lalu ulangi apt-get update dan instalasi


Catatan penting

  • Error File has unexpected size murni masalah di sisi repository (file belum sinkron sempurna), bukan di server Anda.

  • Waktu server Anda sudah benar (cek fase awal ✅), sehingga bukan masalah NTP.

  • Jangan gunakan --allow-insecure-repositories kecuali benar-benar diperlukan, karena itu hanya mematikan pemeriksaan keamanan.

Saran terbaik: Jalankan langkah 1–3 (installer dari GitHub) terlebih dahulu. Sebagian besar pengguna melaporkan masalah seperti ini selesai setelah menggunakan installer terbaru dari GitHub. Jika masih gagal, coba Opsi A (instal webman manual).

Beritahu saya hasilnya setelah Anda mencoba.

No responses yet

Sep 11 2025

Install Mysql 8.4.5 di ubuntu 24

Published by under LinuX

How to Install MySQL 8.4 on Ubuntu 24.04


MySQL is a fast, open-source relational database system used to store, manage, and retrieve structured data developed by Oracle. It stores data in tables organized by rows and columns and uses Structured Query Language (SQL) to manage and access that data.

MySQL is known for being fast, reliable, and easy to use, making it one of the most popular databases for web applications, mobile apps, and enterprise software. It supports a variety of storage engines, offers replication features for scaling and high availability, and ensures data integrity with ACID-compliant transactions.

In this tutorial, we will show you how to install MySQL 8.4 on a Ubuntu 24.04 OS.

Update Operating System

Update your Ubuntu 24.04 operating system to make sure all existing packages are up to date:

# apt update && apt upgrade -y

Add MySQL 8.4 Repository

MySQL 8.0 is the currently available version on the default Ubuntu 24.04 repositories.

Go to the download page for the MySQL 8.4 APT repository.

Also you can run the following command to download it to your Ubuntu 24.04 system:

# wget https://dev.mysql.com/get/mysql-apt-config_0.8.34-1_all.deb

Now install the downloaded .deb package with the following command:

# dpkg -i mysql-apt-config_0.8.34-1_all.deb

During the installation of the package, you will be asked to choose the versions of the MySQL server and other components that you want to install. Choose Ok to finish the configuration and installation of the release package.

MySQL 8.4 APT

Once you are done, update the repository with the following command:

# apt-get update

To check if MySQL 8.4 repo has been successfully installed run the following command:

# apt-cache policy mysql-server

Output:

mysql-server:
  Installed: (none)
  Candidate: 8.4.5-1ubuntu24.04
  Version table:
     8.4.5-1ubuntu24.04 500
        500 http://repo.mysql.com/apt/ubuntu noble/mysql-8.4-lts amd64 Packages
     8.0.41-0ubuntu0.24.04.1 500
        500 http://archive.ubuntu.com/ubuntu noble-updates/main amd64 Packages
        500 http://security.ubuntu.com/ubuntu noble-security/main amd64 Packages
     8.0.36-2ubuntu3 500
        500 http://archive.ubuntu.com/ubuntu noble/main amd64 Packages

Install MySQL 8.4 on Ubuntu 24.04

Now you are ready to install MySQL 8.4 with the following command:

# apt install mysql-server

You will be asked to set root password, you may go ahead and set one.

MySQL 8.4 root password

Then you can verify the installed version of MySQL with the following command:

# mysql --version

Output:

mysql  Ver 8.4.5 for Linux on x86_64 (MySQL Community Server - GPL)

Start the database server daemon, and also enable it to start automatically at the next boot with the following commands:

# systemctl start mysql
# systemctl enable mysql

Check the status of the service:

# systemctl status mysql

Example output:

 ● mysql.service - MySQL Community Server
     Loaded: loaded (/usr/lib/systemd/system/mysql.service; enabled; preset: enabled)
     Active: active (running)
       Docs: man:mysqld(8)
             http://dev.mysql.com/doc/refman/en/using-systemd.html
   Main PID: 5331 (mysqld)
     Status: "Server is operational"
      Tasks: 35 (limit: 2217)
     Memory: 433.7M (peak: 449.8M)
        CPU: 2.315s
     CGroup: /system.slice/mysql.service
             └─5331 /usr/sbin/mysqld

MySQL Create Database

We need to login to MySQL shell with the following command:

# mysql -u root -p

To create a database in MySQL you need to run the following command:

mysql> CREATE DATABASE your_db;

View the new database:

SHOW DATABASES;

To create a new MySQL user, run the following command:

mysql> CREATE USER 'your_user'@localhost IDENTIFIED BY 'password';

Note: You should replace password with a secure password.

Give the user full rights to the new database:

GRANT ALL PRIVILEGES ON your_db.* TO 'your_user'@'localhost';

Refresh privileges so they take effect:

FLUSH PRIVILEGES;

Exit the MySQL shell:

mysql> exit

Comments and Conclusion

That’s it. You have successfully installed MySQL 8.4 on Ubuntu 24.04.

For additional help or useful information, we recommend you to check the official MySQL documentation.

If you have any questions please leave a comment below.

No responses yet

May 27 2025

MOunting datastore yang tiba tiba hilang ketika pindah hardisk Vmware Esxi 6.7

Published by under LinuX

I’ve solved the issue. Leaving this here just in case there is anyone else.
On the host you are having a similar issue:
1. SSH into the ESXi host
2. Run this command esxcfg-volume -l
This should show the good LUNs that are not mounted. If the command returns empty then that means everything is mounted.
3. If the list returns your LUNs then just mount them with this command esxcfg-volume -m <type just the LUN number from the previous command>
4. Check your Datastores on that host and see that the LUN is now there. If not, just rescan datastore.

Hope that helps anyone.
Thanks.

https://www.truenas.com/community/threads/vmware-datastore-no-visible.78819/

No responses yet

May 16 2025

Connect Navicat ke Mysql Server

Published by under LinuX

jika Error nya 10038
solusi ini berarti ada bind di my.cnf atau di mysqld.cnf
langkah silahkan login ke putty atau winscp lakukan edit pada my.cnf atau mysqld.cnf dan kasih tanda # pada baris ini

bind 172.0.0.1

menjadi

#bind 127.0.01

restart mysql seharusnya sucsesfull conectuion

jika errornya 2059
ini karena user mysql ada yang haris di nonaktfkan

A 2059 error will occur when using navicat to connect to MySQL8. This is because the new version of MySQL uses the caching_sha2_password authentication method, but at this time Navicat does not yet support this verification method.

The solution is to change the verification method to the verification method mysql_native_password used in previous versions (5.7 and below).

Langkah nya silahkan login ke mysql di server dengan terminal
root@ubuntu72:~#mysql -u root -p  (enter)
root@ubuntu72:~# (masukkan pasword root mysql)
root@ubuntu72:~#

Welcome to the MySQL monitor. Commands end with ; or \g.
Your MySQL connection id is 1910
Server version: 8.0.42-0ubuntu0.24.04.1 (Ubuntu)

Copyright (c) 2000, 2025, Oracle and/or its affiliates.

Oracle is a registered trademark of Oracle Corporation and/or its
affiliates. Other names may be trademarks of their respective
owners.

Type ‘help;’ or ‘\h’ for help. Type ‘\c’ to clear the current input statement.

mysql> ALTER USER ‘pusikom’@’%’ IDENTIFIED WITH mysql_native_password BY ‘password’;             (ini adalah user yang akan di pakai oleh navicat ke mysql)
Query OK, 0 rows affected (0.08 sec)

mysql> FLUSH PRIVILEGES;
Query OK, 0 rows affected (0.03 sec)

mysql> quit
Bye

coba lakukan conecsi lagi dengan navicat seharusnya successfull

No responses yet

Aug 30 2024

Menambah Ukuran Partisi LVM di Ubuntu Server

Published by under LinuX

buka ini wae gaessss

https://www.linuxsec.org/2020/08/menambah-ukuran-partisi-lvm-di-ubuntu.html

No responses yet

Next »